Creating Lessons
Nextbook makes it simple for you to create and manage both group and private lessons from your account dashboard. Offering private lessons is a two-step process. First specify the types of lessons you offer, and second block time on your calendar during which you are available to teach. Creating a group lesson only requires completing a quick form in which you describe the lesson, when it is offered, the cost, and the participant cap.
Create Private Lessons
To offer a private lesson you will first need to specify which types of lessons you offer.
- Click the Create Private Lessons button on the top row of your dashboard to get started.

Your existing lesson types are shown at the top of the Create Private Lessons page. This table will be empty the first time you login and will fill as you create lessons
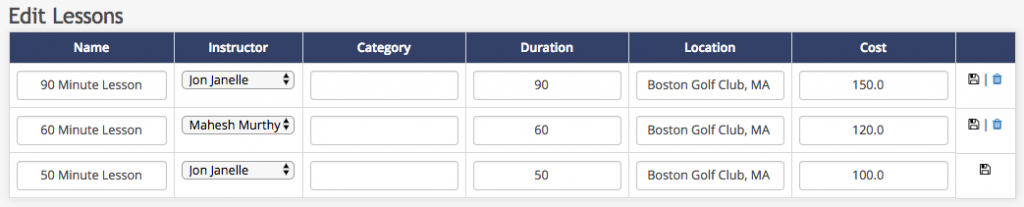
- All of the rows in the table are editable.
- Click the button in the rightmost column to save your changes.
- Delete any lesson types that have not been previously booked using the icon
Create a new private lesson type using the "Create New Lesson" form at the bottom of the page
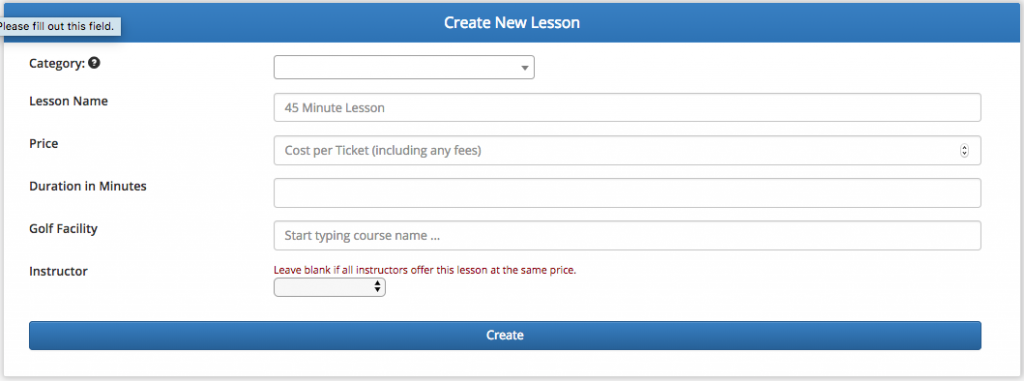
- Lesson types created with this form can be booked during any of your available time blocks.
- If multiple instructors offer the same lesson type at the same cost, then you can leave the instructor field empty
- If multiple instructors offer the same lesson at different prices, then you can create two lessons with the same name, but with different instructors and prices
Block Time for Private Lessons
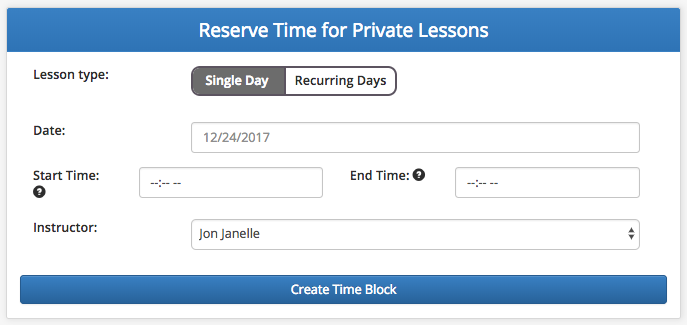
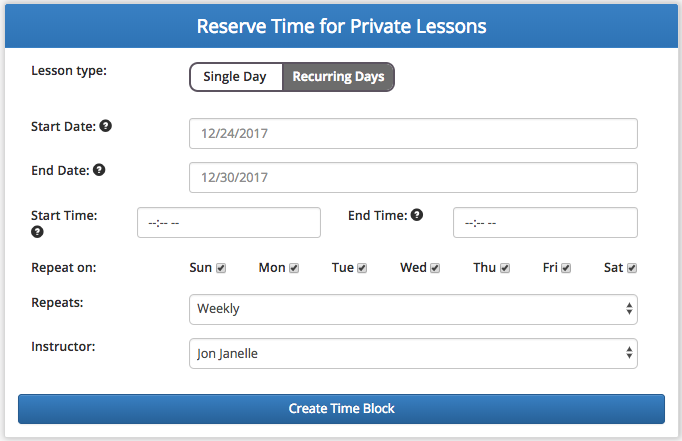
Customers will be able to book private lessons during your available time blocks. First click the Block Time for Private Lessons button on your dashboard.

You can either:
- Block time during a single day
- Block time on multiple days during a week and optionally set the block to repeat on a weekly, bi-weekly, or monthly interval
- After blocking time for private lessons, you will be able to view and edit blocks on your lesson calendar.
- Deleting time blocked for private lessons is done via your lesson calendar
- If a time block is recurring, you can delete either a single time block or the entire recurrence group.
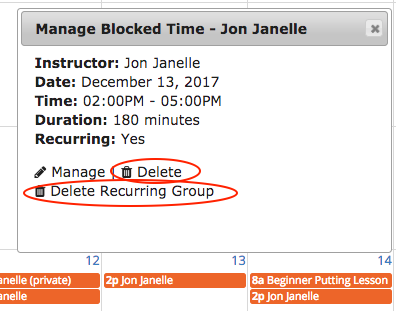
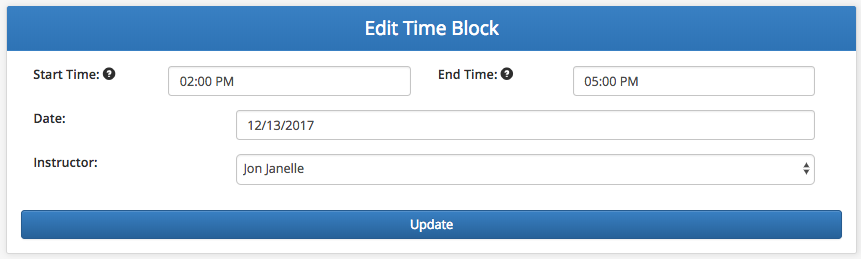
- Clicking the "Manage" button for a time block from your lesson calendar will open a form to edit the block
Create Group Lessons
- Click the Create Group Lesson button on your dashboard

- You will be directed to the New Group Lesson Form. Unlike private lessons, the exact time for each group lesson must be specified in advance
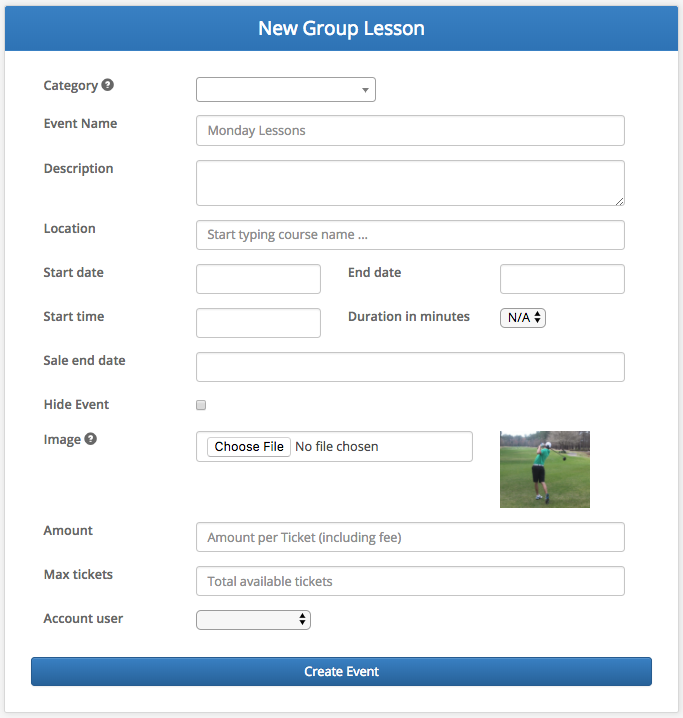
Explanations of form fields
Category
- Lessons with the same category name will be grouped together. For example, you might use the category “Putting Lessons” if you intend to offer various types of putting lesson and want them all to be grouped together.
- Customers will be search your available group events by category, so make sure to use descriptive names
Event Name
- The event name will be the heading of your event for customer searches.
- Make sure that it gives customers a clear, but succinct, idea of what the lesson covers.
Description
- Customers will have the option to view additional details of items when shopping your lessons.
- This can be a few sentences describing what participants will gain from the experience and any prerequisite skills they should have.
Start and End Date
- If your group lesson is one day, then only set the start date.
- If you are offering a multi-day event, then set both the start and end dates.
Start and End Date
- Clicking on the Start Time field will open a time picker tool with sliders to set the starting time of your lesson.
- The Duration in Minutes dropdown is used to specify the length of your event or “N/A” if the duration is indeterminate.
- For example, if your lesson if from 1:00pm – 2:30pm, then set the start time to 1:00pm and the duration in minutes to 90.
Sale End Date
- Set the last available date and time participants can purchase tickets for your lesson.
- This value must come before the start date and time of your event.
Account User
- If your facility has multiple instructors, then select which will be conducting the lesson.
Manage Active and Inactive Lessons
- The active and inactive lesson tables on your manage group lessons page show summary info and links to edit, view payments and process refunds, and download participant spreadsheets for each of your group lessons.
- Lessons are grouped together by category name
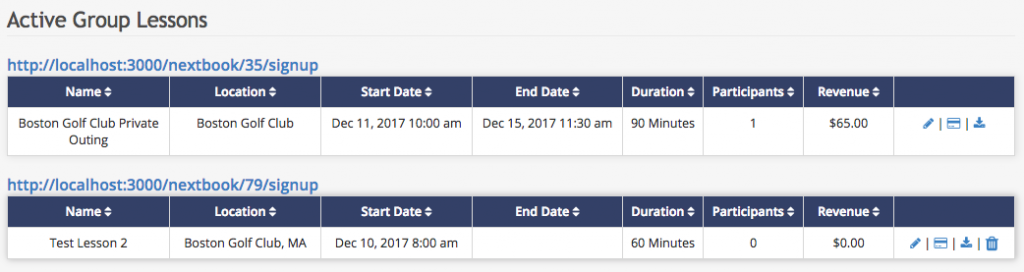
The icons in the rightmost column can be used to perform the following actions:
- Pencil: Edit event details and modify the information collected on participant registration forms
- Credit Card: View payments and manage refunds
- Download: Download a spreadsheet of participant contact and revenue info
- Trash Can: Delete events that have no registrants.
- The Inactive Events tables, shown below Active Events, display all completed or hidden events and include the same functionality.
Payments and Refunds
- Click the credit card icon in the rightmost column of a lesson table entry to enter the view payments page for any of your group events.
- The View Payments page shows a brief description of your participants, the revenue earned from each group, an a link to issue partial or complete refunds.

- Clicking the “Refund” link will bring you to the Manage Refunds page for that event.
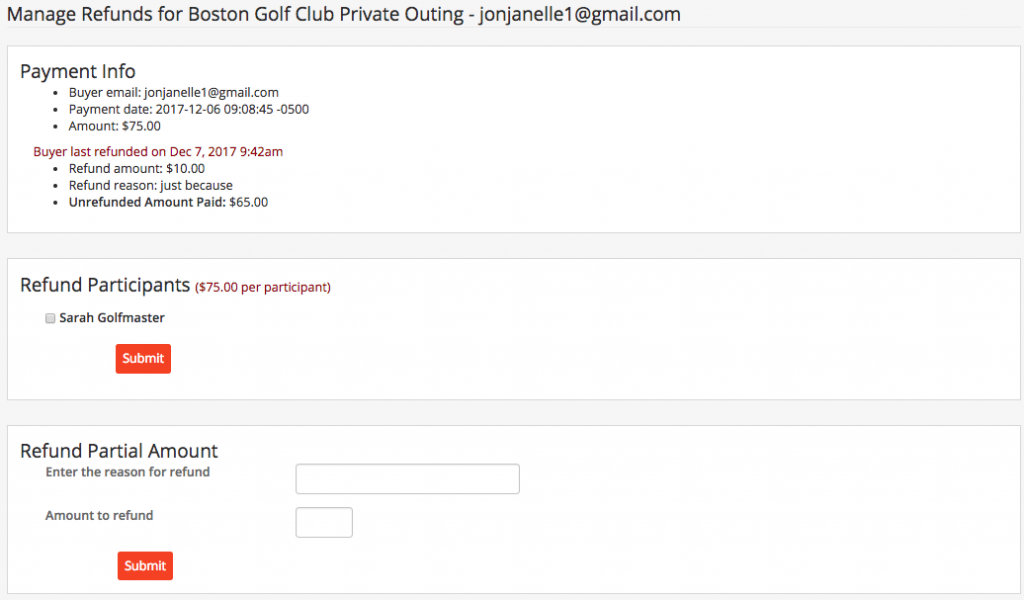
On the refund page you can:
- View info about the ticket buyer
- See the total revenue and any previous refunds
- Partially or completely refund the transaction
To partially refund a transaction: Enter a reason for the refund and the amount to refund in the bottom panel.
To completely refund a transaction: Select all participants and click submit in the middle panel.